The time has come…Christmas decorating! Don’t worry, I love Thanksgiving, so officially no decorations go up until after we celebrate giving thanks. I just could not wait to show you part of my plans for my southern front porch this year! I spied a beautiful decorated door in the pages of Garnet Hill and knew I had to create my own Garnet Hill Inspired Moss JOY Letters…

I am just thrilled with how these turned out, exactly how I had envisioned them. I can not wait to add all the other Christmas touches to my porch this weekend! I think my neighbors may be a wee bit puzzled because they saw me put them up, and then take them down, and put my fall wreath back up! hehe! No Christmas decorating until after Thanksgiving, but I just had to show them to y’all so that you could make your own for Christmas too.
So let’s get started making these Garnet Hill Inspired Moss JOY Letters!
Supplies Needed:
{ Hint: none of these supplies are seasonal, so hopefully they will be available year round in the stores. }
- Wooden Letters in J-O-Y Here is the “J” Here is the “O” Here is the “Y”
- Forest Green DecoArt Crafter’s Acrylic Paint
- 2 Packages Moss Sheets {each covers 2 letters }
- Foam Paint Brush
- Spray Adhesive
- Glue Gun and Glue Sticks
- Scissors
- Small Screw Eyes
- Picture Hanging Wire
Step One:

Using the foam paint brush, paint a coat of the DecoArt forest green paint on the front,side, and back of the letter. It does not need to be perfect as you will be covering the front and sides with the moss. The forest green color matches the moss perfectly to cover any missed spaces. Allow the wood letters to dry fully.
Step Two:

Remove the moss sheet from the package and lay it out, moss side down flat.

Place the wooden letters front side down on the moss sheet. Carefully cut around each letter with the scissors. Make sure to allow for about a 1 inch allowance around the entire letter in order to cover the sides.
Step Three:

Follow the directions on the spray adhesive and apply it to the front of the wood letter. Place the wooden letter on the back of the moss cut out. Remember to allow for the 1 inch allowance when cutting to cover the sides in the next few steps.
Step Four:

Ok, so this is where some sewing skills come in. Don’t worry, I will walk you through it! Not hard at all. Just like when you are making something with curves when you are sewing, we need to “clip the curves” on the moss sheets to allow it to fold up on the sides of the wood letter, and not overlap or bunch up. Simply clip into the allowance in the moss sheet up to the letter. Each place there is a curve, cut a slit into the moss.
Step Five:

Now, just work in sections, applying hot glue to the side of the wooden letter and folding the moss up on the sides. When you get to an area that you clipped, you may need to cut away a bit of the moss to prevent it from overlapping. Once you have covered all the sides, use a pair of sharp scissors to trim the excess moss that overlaps the edge.
Step Six:
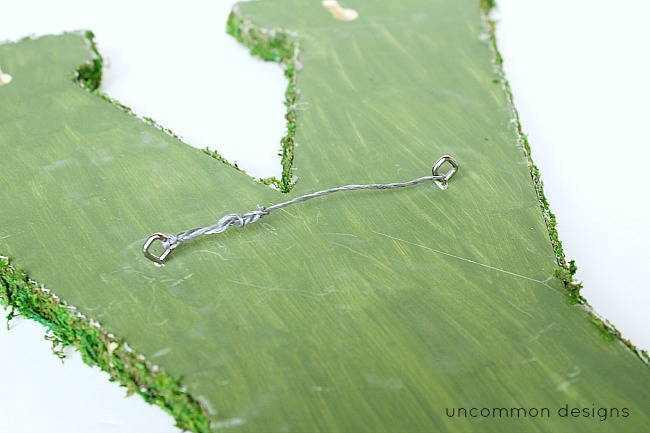
Screw in 2 screw eyes about 3-4 inches apart on the back of each letter and attach picture wire between them to hang the letter to the door. Make sure you place the screw eyes so that the wire does not show once you place it between the screw eyes. I used command adhesive hooks on my door to hang these moss letters. I simply slipped the tip of the command adhesive hook through the burlap ribbon to hold the ribbon in place and allow the letter to hang on top of the ribbon.

The cup hooks allow the letters to hang out a bit from the door. See how pretty the sides look covered in moss? I really love that extra detail of covering the sides. I plan on using command adhesive velcro picture hangers on the bottom of each letter to keep them from shifting and moving when we come in and out.

The “J” was the trickiest to hang since it is off center from the top of the “J” in order for it to be centered with the other letters. You will need to attach a command adhesive velcro at the bottom to keep it hanging straight. Sigh..I love these!

I love using nature inspired things to decorate with in my home and these Moss JOY Letters are just perfect! I am already seeing the garlands and lights on my porch with these. I have already completed another nature inspired project, my Burned Wood Snowflake Christmas Ornaments…I love them!

So tell me..when will you be decorating for the Holidays? I will be sure to take lots of photos of my porch when I am done, you should follow along with us on Instagram to check out some pics!
Enjoy!
this post contains affiliate links
Trish Flake
Latest posts by Trish Flake (see all)
- Easy Leopard Painted Pumpkin - October 18, 2021
- Embroidered Swedish Dishcloths - May 3, 2020
- Easter Egg Decorating Party - March 21, 2020
Girl, I just love these letters! Have a great week. Hugs to you and trish.
I absolutely love these. I love anything moss, and what better way say Christmas than having it hanging on you front door. I will defiantly be making these this week!!!
Wow this is a beautiful piece, stunning
these letters are gorgeous, I love them, you did a beautiful job!
Ingrid
This is seriously stunning Bonnie- I LOVE it. I am inspired to create something fun for my front porch now…
i LOVE this! so cute
Beautiful as always ladies, you always rock Christmas
So cute!
L.O.V.E!!!!!!!
What a super cute idea and inexpensive!!!
Can you show us a picture of the back of the letter with the cup hooks? I’m a bit confused on maybe which cup hooks you refer to? AND How do you attach the letters to the burlap ribbon? Thanks! Happy Thanksgiving everyone!
Oh my goodness…I completely left a photo out! SO SORRY! I have gone back and added the photo and explained how I hung the letters on top of the ribbon! Sorry and thank you for pointing it out! 😉
Thanks! I almost didn’t post the question! Now I’m glad I did – because my interpretation of ‘cup hooks’ was not what you have…so thanks for the picture! Now I know. I’m going to do this tomorrow! Love Love Love!
what are cup hooks? can’t see any in your photos. Did you just use a strip of burlap to attach to? how did you hang the burlap over the door? ie.. not have it fall out each time you opened and closed the door? thanks 🙂
BEAUTIFUL! I love the statement that it makes! Life to the full! Melissa
I just love these. I wonder if they are durable enough for the cold northern weather? I would love to make this for my door as we have a very small front porch and am kind of stuck on what I am going to do to decorate this year. We just moved into this house in October, so this is our first holiday at our new home.
Thanks for another great DIY idea.
hmm.not sure about weather issues. My porch is covered and we tend to have mild Decembers here. You might be able to find a floral sealant to spray on them?
I love the idea but think if I get around to making them I’ll use them on the mantle with my nativity scene. Thanks for the brilliant idea & super easy craft.
LOVE these!! They make me feel joyful just looking at them and I wish I could pop over and pay you a visit and see them (and you!) in person. 🙂
Vanessa
They are stunning!!! I like yours much better than the Garnet Hill ones.
How do you attach the burlap strip to the door?
What a wonderful idea! Thanks for the great directions and pictures. Looks like I am off to Hob Lob tomorrow!
I LOVE, LOVE, LOVE this!!!
I am officially in love with this project! I love moss anything, but premade mossy items are always so pricey. So glad to see an affordable DIY version. Pinning now. Visiting from the Link Party Palooza party.
Hey Girls! It’s Deonna from the Child at Heart blog! I love this post and would love for you to link up to the Merriest Blog Hop and share your creations! Joy is my absolute favorite word. I made a JOY sign too!
This came out so Beautiful!!!! Thank you so much for sharing it with us at our Christmas Extravaganza Party!! Pinning 🙂 xoxo
Love these but don’t think I can get moss around here. So I think I am going to try these with textured paint. I live in Canada so our winters are quite cold with lots of snow. The moss would be dead in no time…LOL. And I need to come up with an idea to coat the ribbon to protect it as well. Thanks for the great idea!
Thank you Bev! You may be able to spray the ribbon with a fabric spray that protects fabric from fading in the sun??
Love this! How did you attach the burlap to the door? Thanks!
I simply looped it over my door frame. I used command hooks to hang the letters and placed the burlap ribbon over the hooks and fed the hok through the ribbon which helped hols it in place too.
Once you looped it over your door frame, did you attach it with a small nail at the top of your door frame? This is TOO TOO TOO CUTE!!!!