Uncommon Designs

Creating Crafts and Home Decor

  • Email
  • Facebook
  • Google+
  • Instagram
  • Pinterest
  • Twitter
  • Home
  • Blog
  • About Us
    • About Uncommon Designs
    • Blogging Assistance
  • Home Projects
    • Apothecary Jars
    • Burlap Ideas
    • Free Printables
    • Mason Jars
    • Home Decor
    • No-Sew Projects
    • Organizing Ideas
    • Sewing Projects
    • Wreaths
  • Holidays
    • Back to School
    • Fall
    • Halloween
    • Thanksgiving
    • Christmas
    • Valentine’s Day
    • Easter & Spring DIY Projects
    • 4th of July
  • Celebrations
    • Party Ideas
    • Party Tutorials
    • Tablescapes
    • Tailgating Ideas
    • Wedding Ideas
    • Teacher Gifts
    • Father’s Day
    • Mother’s Day
    • Handmade Gifts
  • DIY Kits
  • Recipes
  • Contact Us

December 18, 2012 by: Trish Flake

Christmas Angel

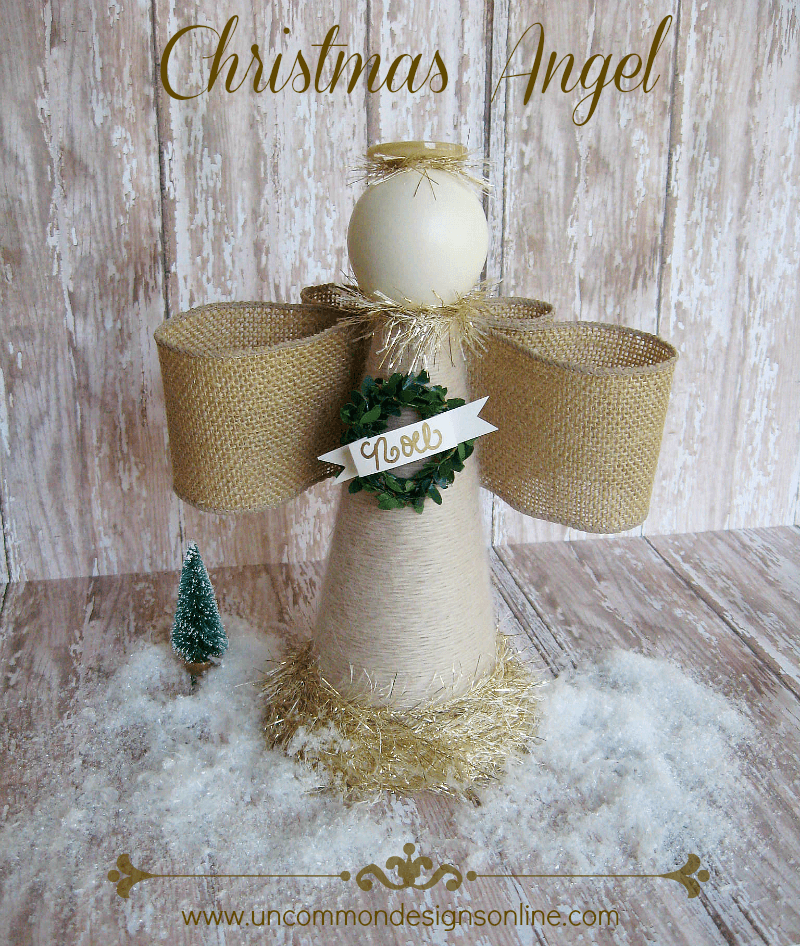
Today I am so excited to show you how to make this precious Christmas Angel…

Christmas Angel

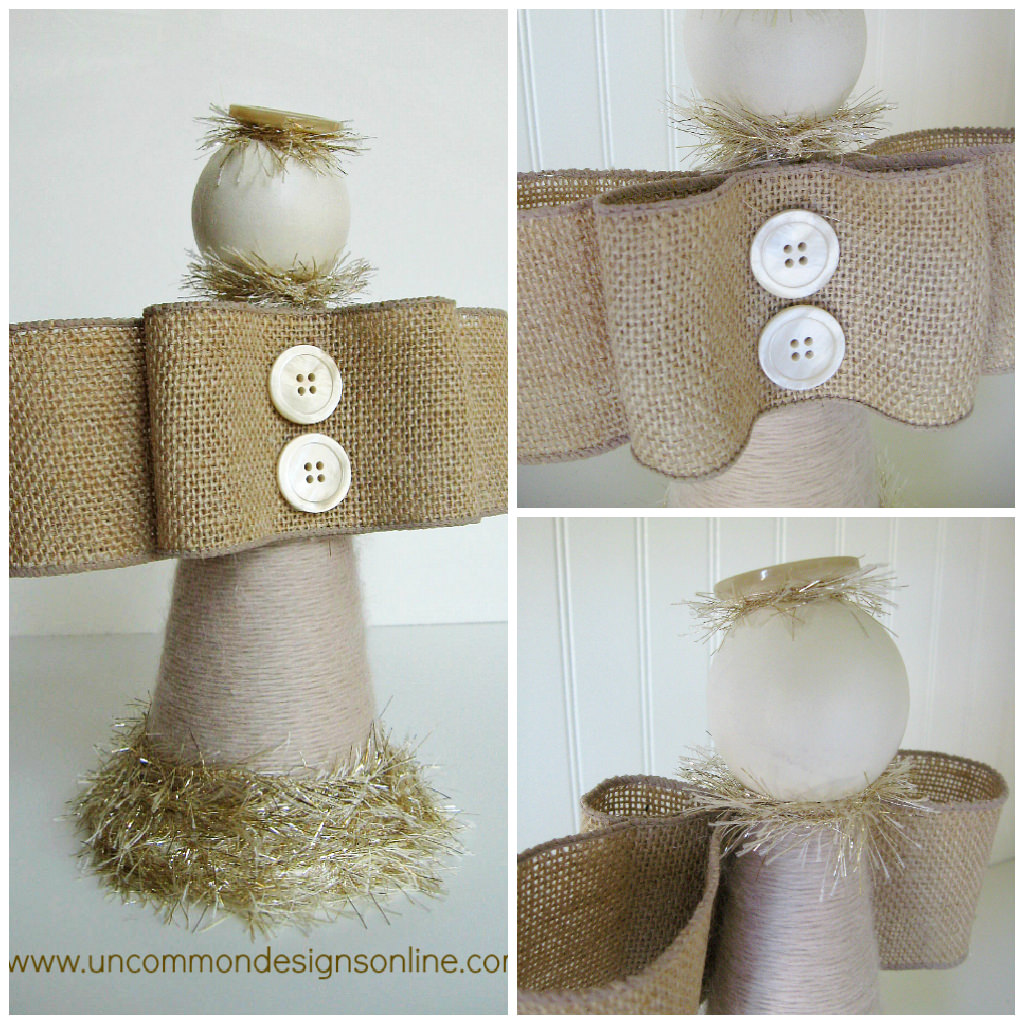
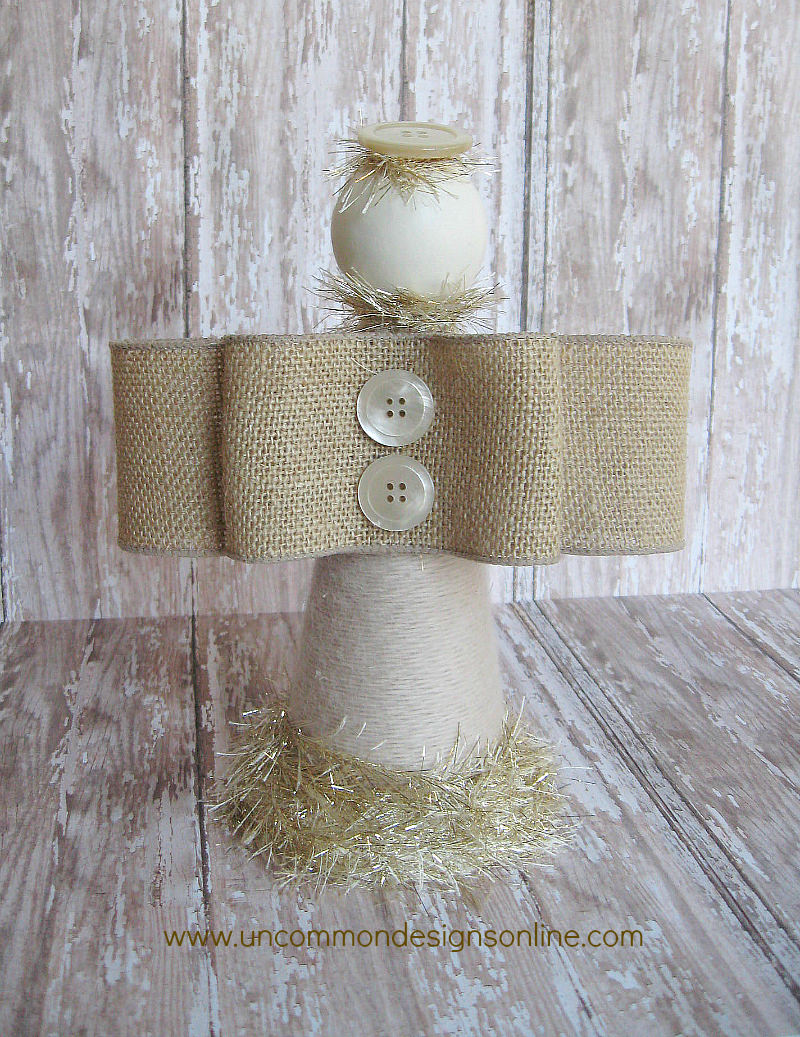
Isn’t she adorable! I love the neutral tones and textures. I am a sucker for burlap, and those little burlap wings are just what I wanted for my little Christmas Angel!

So, let’s get started!

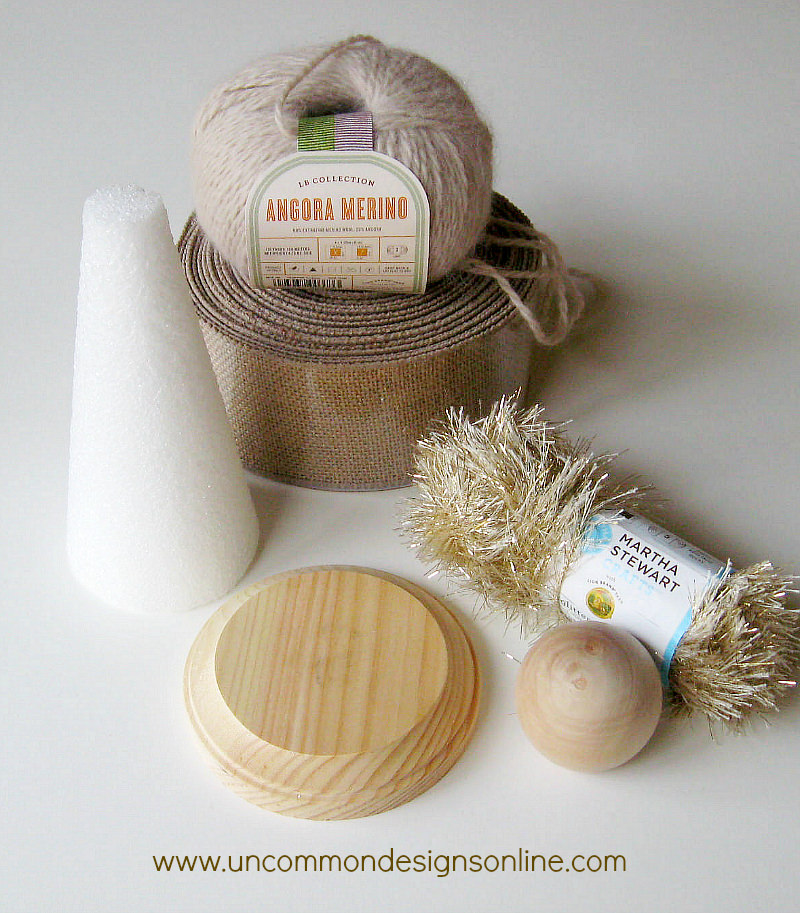
Here are the supplies you will need to create your own little Christmas Angel…

Christmas Angel supplies

 Cream Colored Yarn { I used Martha Stewart Angora Merino yarn }

Glittered Gold and Cream Eyelash Yarn { I used Martha Stewart Eyelash yarn }

Round, Wooden, Flat Bottomed Ball

Styrofoam Cone

Round Wooden Disc

Wired Burlap Ribbon

Cream Spray Paint { I used Rustoleum Heirloom White }

2 Medium Sized Cream Buttons and 1 Large Cream Button

Faux Mini Boxwood Garland { Consumer Crafts }

Gold Metallic Sharpie

Cream Cardstock

Hot Glue Gun and Gluesticks

Christmas angel steps

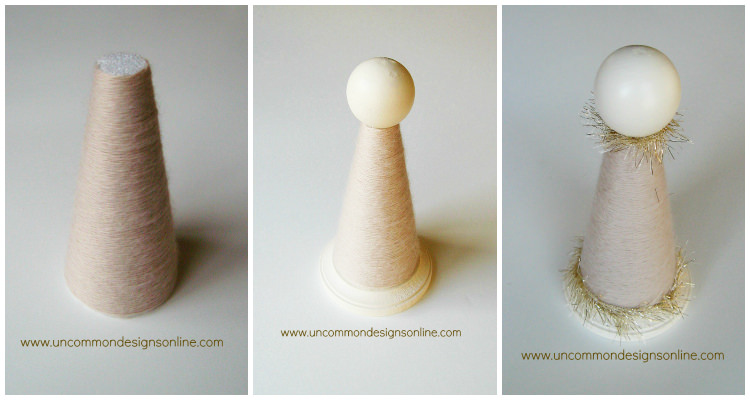
 First, you will wrap the styrofoam cone with your cream yarn. I start at the top and worked down. Apply a little hot glue at the top to get started and then at the bottom to finish off. Spray paint the wooden disc and round wooden ball. Once they are completely dry, use your glue gun to attach the ball to the top of the styrofoam cone and the disc to the bottom of the cone. Next, wrap some of the eyelash yarn around the neck and around the bottom, attaching with a touch of glue from your glue gun.

burlap bow

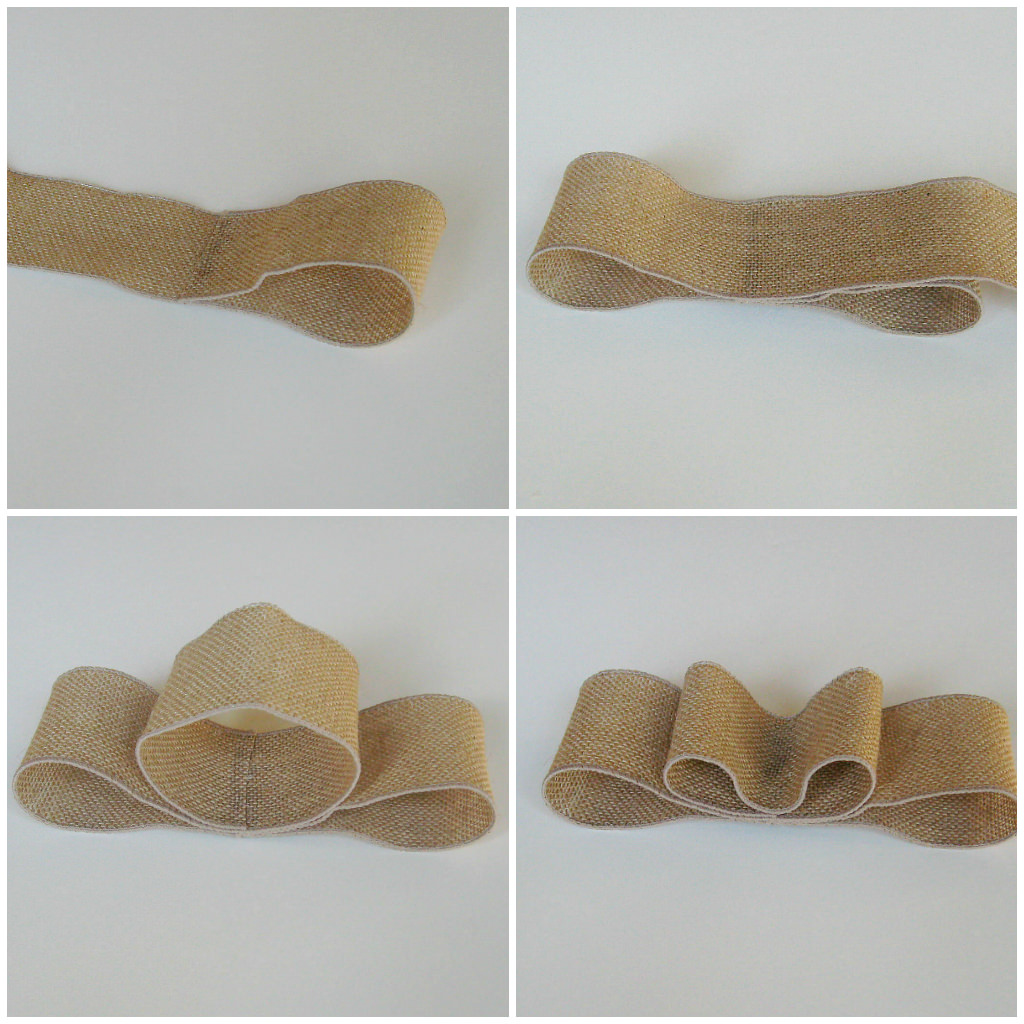
Next, let’s make the burlap bow for your Christmas Angel’s wings. Cut a piece of burlap wired ribbon. I simply estimated the length by the size wings I wanted. Fold over one end to the middle and glue down. Fold over the other side so that it is equal to the other loop and glue in place. Loop the end around to make a smaller loop in the center and glue in place. Finally, glue down the little loop in the center.

Wings and halo

Now you will simply glue 2 of the cream buttons to the middle of the wings and then glue the wings to the back of the angel. I placed mine a little higher than halfway up on her back. The top of the burlap is about level with the top of the cone. Next, glue the larger cream button on her head as the halo. I placed it a little back on her head instead on directly on top. Once the button halo is dry, glue a little of the eyelash yarn around the button.

christmas angel wings

Here she is from the back all finished! I have her placed in my home where you can see the back as well, because it is just too cute to cover up! I love the little buttons!

christmas angel wreath

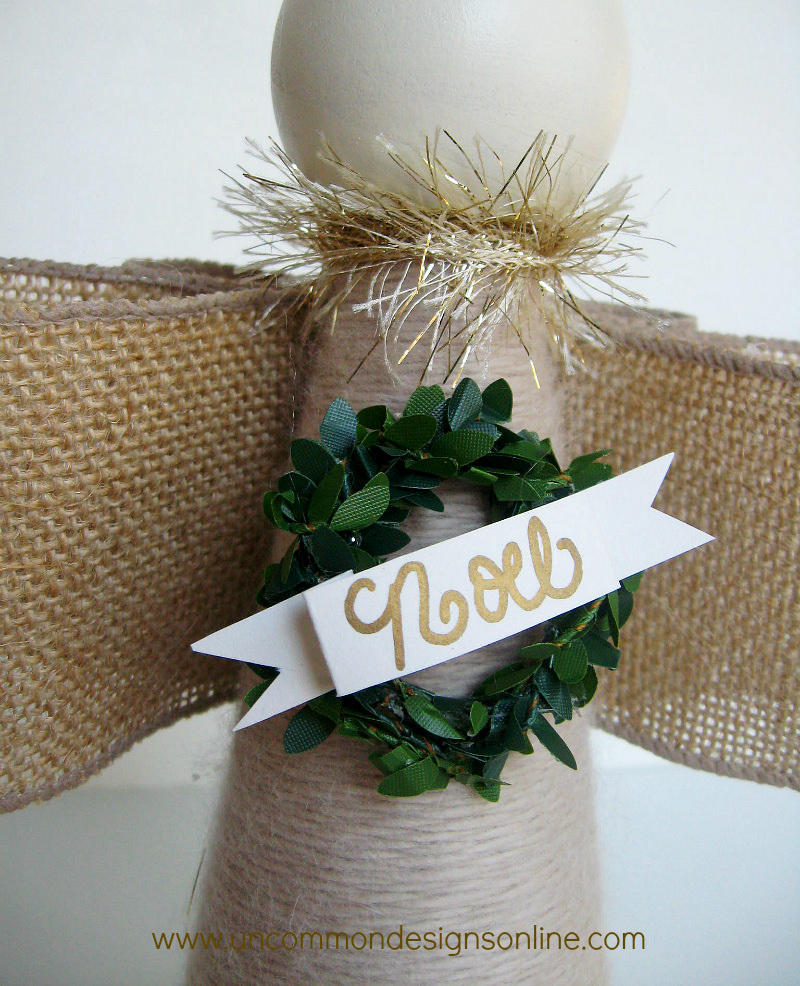
Finally, the last step is to make this sweet faux boxwood wreath and simple banner. I looped the mini boxwood garland around twice and twisted it closed. I then attached it to the angel with the glue gun. I made a quick little banner out of the cream card stock and free handed the word “NOEL” across it in gold. You really could do so many things to her to personalize your angel. She could be “holding” all kinds of things and you could change up the wording on the banner as well!  I chose to not paint a face on her because I really wanted a simple look, but you could totally do a sweet little face with the sharpie!

Christmas Angel

I adore how our Christmas Angel turned out! We hope each of you is enjoying this holiday season with family and friends!

We would love for you to check out some of our other Christmas crafts using burlap, including our JOY Christmas Mantel and our Burlap and Twine Christmas Trees !

Bonnie 

The following two tabs change content below.
  • Bio
  • Latest Posts
My Twitter profileMy Facebook profileMy Google+ profileMy Instagram profileMy Pinterest profile

Trish Flake

Owner at Uncommon Designs
Hey y'all! I am Trish and the creative voice behind Uncommon Designs. I adore party planning, holiday celebrations, and all things crafty! I am so excited to share my creative adventures with you!
My Twitter profileMy Facebook profileMy Google+ profileMy Instagram profileMy Pinterest profile

Latest posts by Trish Flake (see all)

  • Orange Marmalade Walnut Crostini - March 15, 2018
  • Creating a “Come On In” Kind of Home - February 23, 2018
  • Giving Back This Holiday Season - November 17, 2017
Saturday Sponsor Spotlight
5 Gift Wrapping Ideas … { Boxwood Wrapped Gift }

Comments

  1. Lena at OnMySideoftheWorld says

    December 18, 2012 at 10:45 am

    How cute!

    Reply
  2. Yvonne @ StoneGable says

    December 18, 2012 at 7:50 pm

    Precious! I love those button wings!

    Reply
  3. Jamie says

    December 18, 2012 at 9:06 pm

    These are perfect for my mom! She has been asking me to think of a craft she can do with the cones she is accumulating from her knitting creations 🙂

    Reply
  4. Danice says

    December 18, 2012 at 11:26 pm

    Very prim and pretty angel. I found your blog on 52 Mantels’ Christmas Mantel Link Party 🙂

    Reply
  5. Cathy @ Lemon Tree Dwelling says

    December 21, 2012 at 9:49 pm

    This angel is beautiful – I love the natural materials and neutral tones. Thanks for the tutorial!

    Reply
  6. Angie - EasyLivingMom.com says

    December 24, 2012 at 12:14 am

    Very cute! I love angels. This looks easy enough for a craft-impaired person like myself to handle 🙂

    Reply
  7. Andrew Hopkins says

    January 19, 2016 at 2:46 am

    It looks so kuteeeeeeeeeeeeee…
    My family will be make it.
    Thank for share great idea!!!

    Reply

Trackbacks

  1. All Wrapped Up: December Edition - Uncommon Designs... says:
    January 27, 2013 at 9:24 pm

    […] Christmas Angel […]

    Reply
  2. 10 Beautiful DIY Christmas Angel Crafts and Ornaments says:
    November 9, 2014 at 3:11 pm

    […] Christmas Angel | Uncommon Designs […]

    Reply
  3. Deer Head Christmas Ornament - Uncommon Designs says:
    November 26, 2014 at 2:47 pm

    […] Use a bit of faux boxwood garland to create a sweet little wreath around you deer’s head. I love this garland that I picked up at a local craft store a few years ago. I also used it to create a wreath on my  beautiful Burlap Winged Christmas Angel. […]

    Reply

Leave a Reply Cancel reply

Your email address will not be published. Required fields are marked *

Receive Our Posts Free Via Email

Enter Your E-mail Address Below!

Popular Posts

Boho Girls Room with Benjamin Moore's Simply White, a colorful wall hanging, daybed with loads of gorgeous pillows | Uncommon Designs

Boho Girls Room Simply White

Make an Easy and Elegant Floral Centerpiece out of Wine Bottles! Perfect for weddings, bridal showers, and parties! www.uncommondesignsonline.com #WeddingCenterpiece #OutdoorEntertaining

Easy and Elegant Wine Bottle Centerpiece

DIY Ticking Stripe Wooden Server Tray

slow-cooker-honey-barbecue-chicken

Slow Cooker Honey Barbecue Chicken Sandwiches

Categories

Archives

Follow Us On Instagram

Load More...
Follow on Instagram

Meet Trish

Hey y'all! I am Trish and the creative voice behind Uncommon Designs. I adore party planning, holiday celebrations, and all things crafty! I am so excited to share my creative adventures with you! [ Read More ]

Receive Our Posts Via Email

Enter Your E-mail Address Below!

Get the Latest Ideas and Inspiration!
{ we hate spam too, your email address will never be given to 3rd parties.}

Connect With Us

  • Email
  • Facebook
  • Google+
  • Instagram
  • Pinterest
  • RSS
  • Twitter

Looking For Something?

Content & Photo Sharing Policy

Would you like to feature one of our posts or photos that you have seen here at Uncommon Designs? We would love for you to, but we only allow one photo with a direct link back to Uncommon Designs to be used. You may not use more than one photo or a post in it's entirety without our express permission. You may not edit or crop our photos, or remove or add any other watermarks. You may not repost the steps to a tutorial or any part of a recipe. All of our posts are copyright protected. If you have any questions concerning our Content & Photo Sharing Policy, you may contact us at uncommondesigns {at} yahoo {dot} com.
  • Blogging Tips
  • Resources for Bloggers
  • Disclaimer Policy
  • Disclosure & Privacy Policy
  • Advertising Inquiries
  • Contact Us

© 2018 · Uncommon Designs

Get started Creating a Beautiful Life! 

Receive ideas, projects, and recipes to your inbox FREE!

Join the Uncommon Designs readership family!

We never spam & you can unsubscribe at any time.

×