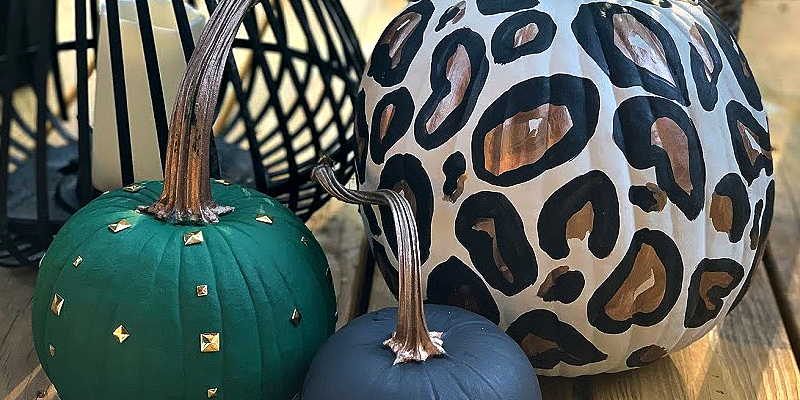
Related Posts Plugin for WordPress, Blogger...

Thursday, February 23, 2012

Uncommon Events: A Minnie Mouse Birthday Celebration


 I am so excited to share my little La La's Minnie Mouse birthday celebration with you today!  Minnie is her absolute favorite, so this was our only choice for her big shindig!


The tables were set for her to share a sweet picnic lunch with all her friends. Of course, they needed little mouse ears and hands for the perfect Minnie play date!


   I fell in love with these black and white polka dot gable boxes from  Pocket Full of Glitter.  They came with the ribbon and a personalized tag that I put on the favors.  So cute! She has tons of adorable designs in her shop!   


  We kept with the pink,black, white, and dots at the sweets table, too! 

Here are the cake stands we showed off last week! For a full tutorial click here!


Since we held the party at a playground,  we needed to narrow down the actual party space a bit.  We hung a string of tissue pom poms from two trees and it really helped to focus in on the space.  


We put fun polka dot balloons at the entrance to the actual playground.  Nothing screams fun like polka dotted balloons!


Here is little La La ready and waiting for her friends to arrive!  She was all giggly, as usual!  Once everyone got there, the children ran for the swings and slides and then not too seconds later...


Rain!  Not a drop here and a drop there, but a full on rain storm!  Thankfully we had a gym to run to and we just grabbed everything and set  up the tables in there!  The kids didn't mind a bit! 

 
They dressed as pint sized Minnie and Mickeys, ate goodies, ran, jumped, rode Little Tykes cars, and had a ball! 


La La  said all of her thank you's and everyone went home tuckered out with their sweet Minnie coloring books.  We got everything packed up and the rain stopped,  of course!


We would love for you guys to link up your projects to our Uncommonly Yours link party

*Trish

Tuesday, February 21, 2012

Uncommonly Yours... { Link Party #16 }

Thank you so much for another amazing Uncommonly Yours link party last week!  It means so much to us that you grace our little sliver of blog land and you have to be the most creative group of crafters out there!  We are so thrilled to have you each week and can't wait to see what you have been working on!  


But first... let's take a look at last week's  Featured Projects...


Eclectically Vintage revealed her jaw-dropping kitchen.  It really  is just stunning!


Aren't these Ombre Headbands by Chasing Sunshine  so elegant?  These just went on my to-do list!  


It All Started with Paint   was so inventive with her Family Command Center wall. You really should check out her post... it is too funny!


I love how Mommy by Day Crafter by Night stenciled this beautiful lamp shade. Such a bold new look!  


Mommy is Coo Coo had the genius idea to hang a door on her bathroom wall as a towel rack!  Her posts are always cracking me up, too!


Finally, Lady with the Red Rocker shared her Two-Ingredient Strawberry Cake recipe!  Looks crazy delicious!


Thank you to everyone for making our link party so much fun! If you were featured, please grab a featured button to display on your blog.


UNCOMMON


 If you would like to "pin" any of these features to pinterest, please do so by visiting the individual blogs and pinning from there to give proper creative credit!  Thanks!


Now, on to this week's party...


Here is what you do...

*Link to a specific post --not your home page, no giveaways, no ads for shops, or  ETSY shops please!

* Link projects and ideas that you have created! Please link up projects and ideas that you have not linked up previously!

*Please Follow Uncommon - we have the new LINKY FOLLOWERS gadget on our sidebar!

*Please link back to us...grab our cute little button, { a text link at the end of the post is nice too! }

*Spread the word about our weekly link party and stop by and visit a few other links!! :)


UNCOMMON

Monday, February 20, 2012

Lucky... { A Four-Leaf Clover Towel for a Friend }


Have you ever considered how lucky you really are? 

I do, but not nearly as often as I should.  Last night the hubs and I went out for a little post-Valentine's dinner.  It was so good to get away for a bit.  After we enjoyed our quiet meal {hallelujah!}, we grabbed a couple of fortune cookies on the way out. 

 Here is what mine read....

Over the last year or two... I have needed good friends... and God delivered them in abundance! 

As I sat down today to make a birthday gift for one of those sweet friends,  I knew exactly what I would sew for her. She loves to cook and she also is SO good about decorating for holidays, so a festive kitchen towel was in order!  The four leaf clover represents St. Patrick's Day, but more than that it symbolizes luck.  I wanted her to know how lucky I am and how blessed I am to have her in my life! 

I am one lucky lady and blessed beyond measure!


* Trish    


Thursday, February 16, 2012

Uncommon Events: Pretty Cake Stands { A Tutorial }


 If there is one thing I love about styling parties, it has to be the sweets table!  If you are planning out the table design, you will need to arrange your items at varying heights to keep the look interesting and polished.

  Now, I am a cake stand lover, but my budget does not allow for one in every shape, color and size.  So, I decided that I needed to make one or four (hee hee!)  that I can embellish for a particular event. They ended up being pretty easy to make and I even used a power tool... a drill!  Now, for all of you ladies who can rock a sander or saw super for you, but I was just excited that I didn't drill the stand to my deck! :)

Here is how I made them...


Cake Stand Tutorial


Supplies:

furniture legs (I got mine from Home Depot)
rectangle or square 1 inch thick wood for the top
smaller square plaque for the base (Hobby Lobby)
drill and drill bits
spray paint
screws


Step One. The first thing you will want to do is drill all of the pilot holes.  A pilot hole is where you drill a small hole into the wood where you will insert the screw.  It helps to make sure the wood won't split!  You will need to drill one in the middle of the base piece, the top piece, and at the top of the furniture leg. 

Step Two.  Now you will screw the furniture leg right into the base piece.  The legs come with one screw already attached at the bottom, so this is a super easy part!


Step Three.  For this step, you will insert the screw into the pilot hole in the top and attach it to the furniture leg.  Just about all done!


Step Four.  Painting time!  You will want to sand the cake stand to make sure your paint will go on smoothly.  Next, add a few coats of spraypaint in your favorite color.  Now you have a nice, fully functional cake stand for a fraction of the cost!

At this point I could leave well enough alone, and use the stands as they are.  But.... well, you know me... I have to fancy them up a little!  Here are a couple of ways I have decorated them for events that I have styled, but the possibilities are endless...


Linking To: Sassy Site's FFA Party,Fingerprints on the Fridge Feature Yourself Friday,Whipperberry's Friday Flair,Be Different Act Normal's Show and Tell Saturday,Tatertots and Jello's Weekend Wrap Up Party, Naptime Crafter's Friday Fave's Party,Craftomaniac's Monday Link Party,Someday Craft's Whatever Goes Wednesday,I Heart Naptime: Sundae Scoop, Craft Envy: Saturday Spotlight, Under The Table and Dreaming's: Sunday Showcase; Flamingo Toe's Think Pink Sundays, The Girl Creative: Just Something I Whipped up, Todays Creative Blog: Get Your Craft On,Tip Junkie: Tip Me Tuesday,   Not Just A Housewife Show Me What Ya Got, Lolly Jane Boutique Whatcha Got Weekend, Somewhat Simple Strut Your Stuff, Clean and Scentsible The Creative Spark , Simply Designing Simply Link Party,  Lil' Luna Link Party , Blue Cricket Design Show and Tell ,  House of Hepworths Hookin' Up With HOH , Southern Lovely Show and Share , The Shabby Nest Frugal Friday , 30 Days Pity Party, Home Stories A to Z Tutorials and Tips TuesdayCreations By Kara Look What I Made,  The Idea Room Linky Party,
Delightful Order Delightfully Inspiring, Not So Simple Housewife Recreate Into Something New,Homework The Inspiration Board, 504 Main Tickled Pink, Delicate Construction Delicately Constructing Friday, Reasons To Skip the Housework Tuesday Time-out, Passionately Artistic Linky party, My 1929 Charmer Sunday Best, Serenity Now Weekend Bloggy Reading, Strictly Homemade Tuesday, At The Picket Fence Inspiration Friday, DIY Showoff Link Party, Skip to my Lou Made By You Monday, Brassy Apple Mom It Monday, Sumos Sweet Stuff Market Yourself Monday, The Shady Porch Rock and Share,   The Artsy Girl Connection Pinspirational Thursday, Blissful and Domestic Featured Friday, The Grant Life Friday Link Party, Too Much Time on My Hands Get Schooled Saturday, Design Dazzle Link Up Party!, Rustic Crafts Shabby Shares, Saved By Love Creations Thrifty Thursday, The Crafty Nest Do Something Crafty, The Sasse Life Crafty Sasse Wednesday, Southern Product Queen's One Stop Shop,  Boerman Ramblings Tuesday Treasury,Nifty Thrifty Things Nifty Thrifty Sunday,  Oopsey Daisy. Wednesday Wowsers, The 36th Avenue Share Awesomeness Thursdays, Mom On Timeout Take A Timeout Thursdays, 52 Mantels Thursdays are Your Days, Coastal Charm Nifty Thrifty Tuesday,   Weekend Craft Soiree with Homemaker in Heels; The Real Housewives of Riverton Round-Up, It's Overflowing Overflowing with Creativity, Simply Klassic Home Simply Klassic Sundays,
A Turtle's Life for me Share And Wow Wednesday, Happy Hour Projects Freestyle Fridays, Pocket Full of Pink Friday Frolic, I Gotta Create Kiss and Tell, Simply Sweet Home Friday Favorites, Six Sister's Stuff Strut Your Stuff Saturday, Chef-In-Training Tuesday Talent Show, Craft Monkey Craft Monkey'n Mondays, The Kurtz Corner Tuesday Tutorials, The Sasse Life Crafty Sasse Wednesday